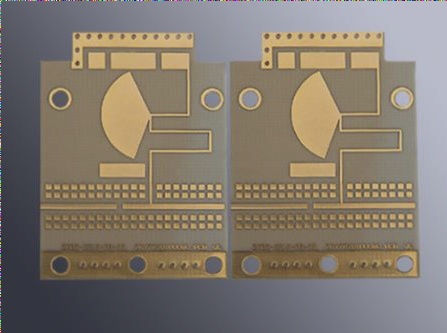
Because the size variability of the plastic parts in the FR4 PCB manufacturing plant is often very large, structural deformation, insufficient shrinkage, or oversized phenomena can occur when injection molding is not carefully monitored, resulting in sizes that exceed specifications. Sometimes these issues may not seem important, but the designer may specify a very small tolerance in the dimension marking, and some may even mark them as key dimensions. Consequently, it is often necessary to inspect these out-of-spec parts for actual assembly to confirm their usability and functionality.
At times, it is also necessary to discuss dimensional tolerance with the design engineer. If time and resources allow, these issues should be addressed during the DFM review stage before mass production. However, due to the increasingly shorter pre-production processes for product launches, many individuals may intentionally or unintentionally overlook these operations under the pretext of time constraints, leading to potential issues during mass production.

However, the issues surrounding the size and structure of the plastics in the FR4 PCB manufacturing factory can be resolved, as it is typically within my realm (process/engineering) to make the final decision on whether to proceed. Regardless, I am still accountable for any functional issues that may arise in the future. The most troublesome problem is the appearance, as external issues can be tolerated by others. It is crucial to collaborate with the quality control engineer to establish standards during such times. When dealing with plastic parts of varying colors, a color difference meter should be used to measure a, b, delta values, and so on. However, ultimately, the final judgment is made with the naked eye, after looking at it in fluorescent and sunlight, as sometimes the differences in values may be minimal, but visually unacceptable.
Specifications for scratches and stains will also need to be determined. The depth, width, and length of a scratch, as well as the diameter, number, and distance of a stain, must be defined. The most troublesome part is the bite. The bite issue typically arises after the plastic has been injected for a period of time, causing the bite pattern to gradually blur or fade. Typically, a sample will be produced and signed off by engineers from relevant departments. In the event of an issue, the sample will be compared against the original.
There was an interesting question at one point regarding the term “burr” in English. It has always puzzled me why the burr of metal parts is known as burr, while that of plastic parts is called flash. I always believed that flash meant flash and should be used in the context of metal burr. Later, a coworker told me that in the early days of human history, there was no distinction between metal and plastic processing. Originally, burr meant “prickly fruit” in English, referring to the prickly fruit found in plants. As industry developed, metal processing products started to emerge. Upon noticing that metal objects had burrs similar to prickly fruit, they were called burrs, and when plastic parts emerged, they called the burrs flash to distinguish between the two. This is the explanation that I was given, but I am not sure if it is accurate.
Second source import is an inevitable aspect of production, and it is something that we must undertake. However, the manner in which it is done is crucial. Ideally, second source importation should occur during the final trial production before a new product enters mass production, as at this juncture, the product is nearing a mature stage, and there are typically no major design changes. The second source part can obtain the same verification conditions as the primary source, and any discrepancies will not likely cause significant differences. Completing the verification of the second source in the research and development stage is the most time-saving and efficient approach, as individuals who take over later may not be aware of the issues encountered during the research and development phase, or the key areas that need attention. Furthermore, the assessment of second source suppliers is also a critical task, as choosing a supplier with quality control issues will not only negate the benefits of the second source, but may also lead to product quality problems and impact shipments. I will discuss these matters further when time permits. In addition to quality evaluations, suppliers should also be assessed for their technical capabilities. For PCBs, the ability to produce fine spacing (3mil/3mil, 2mil/2mil), the number of layers that can be produced, and HDI (High Density Interconnect) capabilities should be clearly documented. Despite the completion of most second source activities during the new product stage, there will still be missed products, and it is often difficult to predict when a manufacturer will cease production of a certain part, which means that subsequent second source requirements will continue to arise, unless our FR4 PCB product is also completed.
At times, it is also necessary to discuss dimensional tolerance with the design engineer. If time and resources allow, these issues should be addressed during the DFM review stage before mass production. However, due to the increasingly shorter pre-production processes for product launches, many individuals may intentionally or unintentionally overlook these operations under the pretext of time constraints, leading to potential issues during mass production.

However, the issues surrounding the size and structure of the plastics in the FR4 PCB manufacturing factory can be resolved, as it is typically within my realm (process/engineering) to make the final decision on whether to proceed. Regardless, I am still accountable for any functional issues that may arise in the future. The most troublesome problem is the appearance, as external issues can be tolerated by others. It is crucial to collaborate with the quality control engineer to establish standards during such times. When dealing with plastic parts of varying colors, a color difference meter should be used to measure a, b, delta values, and so on. However, ultimately, the final judgment is made with the naked eye, after looking at it in fluorescent and sunlight, as sometimes the differences in values may be minimal, but visually unacceptable.
Specifications for scratches and stains will also need to be determined. The depth, width, and length of a scratch, as well as the diameter, number, and distance of a stain, must be defined. The most troublesome part is the bite. The bite issue typically arises after the plastic has been injected for a period of time, causing the bite pattern to gradually blur or fade. Typically, a sample will be produced and signed off by engineers from relevant departments. In the event of an issue, the sample will be compared against the original.
There was an interesting question at one point regarding the term “burr” in English. It has always puzzled me why the burr of metal parts is known as burr, while that of plastic parts is called flash. I always believed that flash meant flash and should be used in the context of metal burr. Later, a coworker told me that in the early days of human history, there was no distinction between metal and plastic processing. Originally, burr meant “prickly fruit” in English, referring to the prickly fruit found in plants. As industry developed, metal processing products started to emerge. Upon noticing that metal objects had burrs similar to prickly fruit, they were called burrs, and when plastic parts emerged, they called the burrs flash to distinguish between the two. This is the explanation that I was given, but I am not sure if it is accurate.
Second source import is an inevitable aspect of production, and it is something that we must undertake. However, the manner in which it is done is crucial. Ideally, second source importation should occur during the final trial production before a new product enters mass production, as at this juncture, the product is nearing a mature stage, and there are typically no major design changes. The second source part can obtain the same verification conditions as the primary source, and any discrepancies will not likely cause significant differences. Completing the verification of the second source in the research and development stage is the most time-saving and efficient approach, as individuals who take over later may not be aware of the issues encountered during the research and development phase, or the key areas that need attention. Furthermore, the assessment of second source suppliers is also a critical task, as choosing a supplier with quality control issues will not only negate the benefits of the second source, but may also lead to product quality problems and impact shipments. I will discuss these matters further when time permits. In addition to quality evaluations, suppliers should also be assessed for their technical capabilities. For PCBs, the ability to produce fine spacing (3mil/3mil, 2mil/2mil), the number of layers that can be produced, and HDI (High Density Interconnect) capabilities should be clearly documented. Despite the completion of most second source activities during the new product stage, there will still be missed products, and it is often difficult to predict when a manufacturer will cease production of a certain part, which means that subsequent second source requirements will continue to arise, unless our FR4 PCB product is also completed.


